How to make a float fishing rig
Float fishing is the most popular way of fishing around this area by far. Even the professionals float fish whether it be for live bait or just to fish.
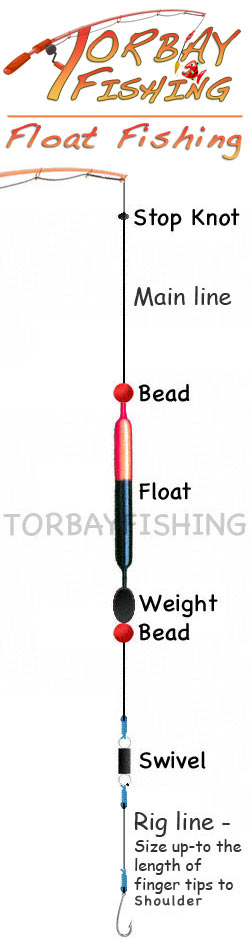
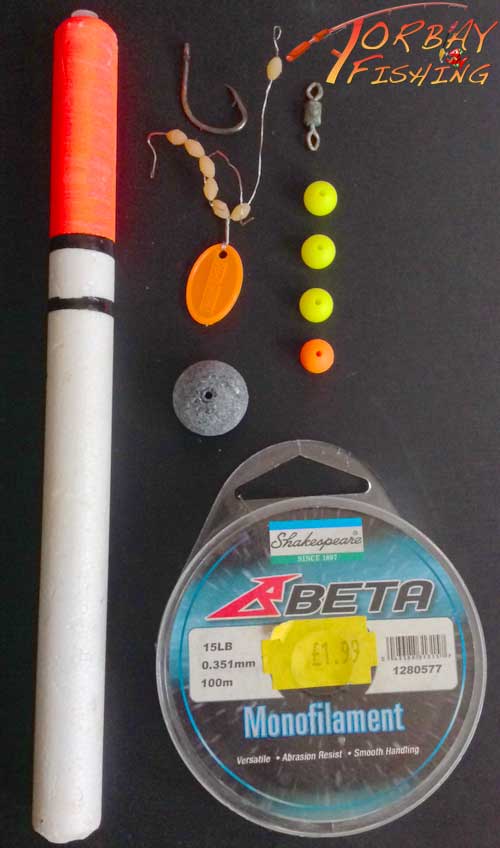
Let's look at a photo of the rig and what you'll need to make it…
What you need
- Spare line (you should always carry the excess line you have left over after filling up your reel)
- Stop Knot or Rubber Band
- Beads
- Float
- Weight
- Swivel
- Hook
The set-up
Unlike bottom fishing most of your set-up will be on your actual main line which comes off your reel.
Start off by feeding your line up through the rings in your rod and give yourself plenty of spare line once it's through your rod. About hand to shoulder in length will do.
First thing you need to do is add your stop knot. A stop knot is needed to prevent the bait sinking to the bottom. I'm going to cover this detail before we get to the rest of the set-up…
The stop knot
When you cast a float into the water the float will rise up the line until it reaches the stop knot and then won't be able to go any further. Without the stop knot you can't control the depth and your hook will simply sink to the bottom. The stop know allows you total control over the depth you'll be fishing.
By sliding the stop knot up or down your main line you can control at what depth your bait and hook will sit. If you have it close to the swivel, your bait will sit just beneath the surface. By giving plenty of distance between the stop knot and float your bait will sit deeper in the water.
As a general rule your stop knot needs to be two or three arm lengths up the line from the swivel. If you're not catching anything keep raising or lowering the stop knot until you find the depth the fish are swimming in.
The very best stop knots I have ever come across are like the ones you see in the image below:
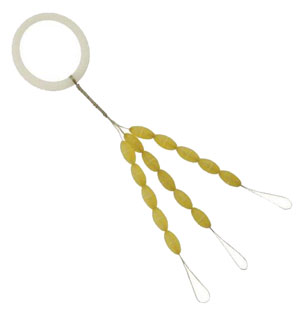
They are very simple to attach and once on they stay exactly where they are but are still easy to slide up and down to change depths.
To see how you attach this to the line
click on the image below to enlarge it:

*USEFUL TIP*
Small, electrical tubing makes a great stop knot!
If you have a small piece of tubing for the stop knot then all you do is feed the line through it and then feed it through it again. It will now be very hard for the stop knot to move about and by pulling the line either side of the stop knot you tighten it even further.
What you want is the stop knot to be tight but for you to still be able to move it up and down the line when your hunting for the depth of the fish. You will also want the stop knot to be able to fit through the rings on your rod.
*USEFUL GUIDE!*
When I'm about to cast, my float is up by the tip of the rod and the stop knot is right down by my reel. It's had to pass through every ring to get there so it has to be small enough to not catch on any of the rings.
Remaining set-up
So once you have the stop knot on you then add a bead.
Now add the float.
Now add the weight.
Now you add another bead.
Finally tie the swivel to the line.
So that's your main set-up done and you can put your rod to one side for a bit.
Cut yourself a piece of line from the spare line you carry with you. As a rough guide the size is from your hand to shoulder. Tie one end to the swivel and the other end tie on your hook.
That is all you need for float fishing!
Problems you may have with your float
You may run into problems where your float is not sitting correctly when you cast out. Here is how it should look and the likely cause for your problems…
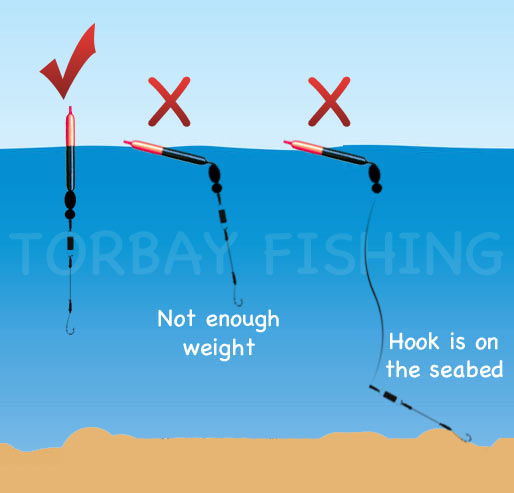
It is important that you have the correct weight for the float you're using.
Depth for float fishing
The most useful tool (and often under utilised) is the stop knot. From this simple little knot you have a lot of control over the types of fish you can catch.
Garfish are commonly near the surface as they try catching the smaller fish. Mackerel can feed near the surface but they are normally caught midway between the surface and the sea bed. Pollock hunt for food at about the same depth as mackerel. Wrasse and Bass can also come up from the sea bed to chase after food.
Use this image as a rough guide to whereabouts they are…
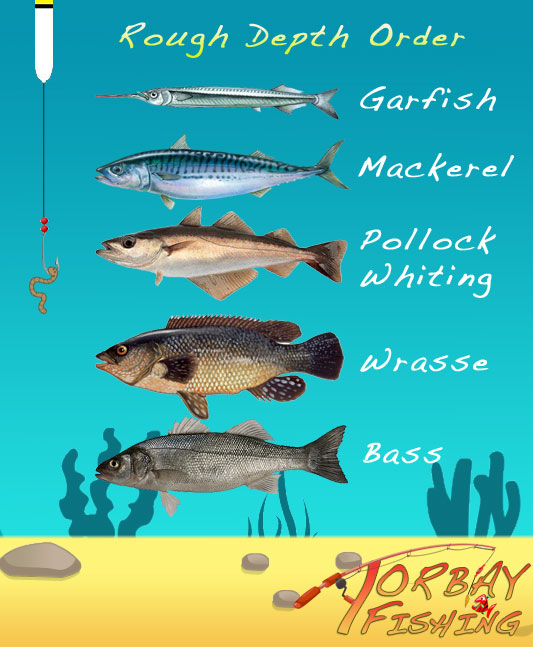
It is useful to try different depths to see what you can catch. If others are catching but you're not why not look at where their stop knot is and how deep they are fishing.
How do I know when I have a fish on?
The float will suddenly disappear and shoot down into the water. Other times the float may just go a little under the water. The best time to strike is when the float shoots down. You strike by raising your rod up in a single fast and constant action. The idea is that the fish is already on the hook and by raising your rod up fast you make sure it's on.
If you find that your float is barely going under you may have a fish on but it may also be that you have a fish eating at your bait but it isn't on your hook. In these cases it's up to you whether you strike or not. I tend to leave it a short while to see if the fish gets caught on the hook before I strike.
What hooks to buy
Hooks are something that confuses many people and it is vital you get the right ones for where you fish.
Bigger hooks do not mean bigger fish!
If you have satellite TV watch the lake fishing programmes like the ones Matt Hayes is on you'll see monster fish caught on the smallest of hooks.
The hook lengths are designed for the type of bait you might be using.
For mackerel strips the length of the hook doesn't need to be long. The longer length shanks on hooks are designed for worms like rag which you feed up the length of the shank.
Circle hooks are becoming very popular because they virtually eliminate the need to strike. These hooks are designed to hook the fish as they take the bait. This is the hook I'm using more and more when I'm out float fishing and I really like them.
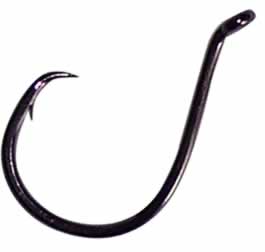
A circle hook virtually eliminates striking.
Types of Fishing Floats
There are many types of fishing floats and people have asked what ones to use. Here is a quick guide:
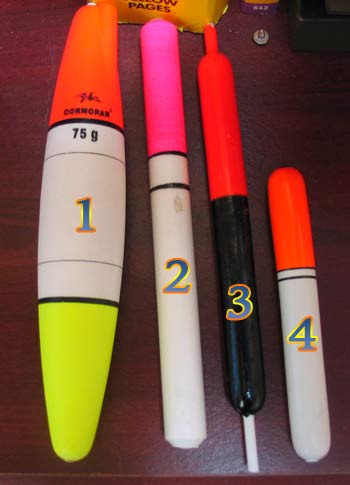
1. Light-up at night float
This float has a second hole on the top to enable you to place night light stick. A good float but quite heavy. You can't cast great distances and it makes a lot of noise when it hits the water so you may scare away fish.
2. Polystyrene float
These cost more than all other floats but are worth it because unlike "3" it doesn't crack after a short amount of use. These are also good for distance casting because they are quite aerodynamic and use a quite heavy weight so good casting distances can be had. There is however, just like all the others, a problem with this float. I have found that this float scrapes the line and slowly weakens it. If you don't check every hour or so you'll find on a cast or reeling in a fish that your line will snap.
3. Plastic float
As mentioned above these floats tend to break and crack very easily. There is however a version the same size as "4" which is very good (see below)
4. The tiny float
If you are fishing a clam sea and distance isn't an issue these floats are great but the smaller version of "3" is better still. These floats are so sensitive you can easily detect the smallest of bites. These are harder to use because there isn't much top showing but if you can get used to them you'll grow to love them. I will often use the "3" of this size because I catch more fish.
The verdict for the above types of floats...
When distance and money come into things "2" wins hands down. Hard to break, lasts a long time and aerodynamic. It's possible to cast huge distances with this float.
When catching or detecting the smallest of bites matters the smaller version of "3" is a great float to use in calm waters.
Help support this site!
If you value the information on this site then please help support me with the large running costs.
Recent Donations, thank you! £5.00
If this page didn't help you please, please, please email me here and tell me what you wanted on this page. I can add whatever it is you think was missing!
MUST SEE…
Also see...
- Fishing training in Torbay, Devon.
- Sea fishing seasons
- How to set-up a float for fishing
- How to tie a clinch knot (commonly used)
- How to tie a lock blood knot (commonly used)
- How to tie an Albright fishing knot to join two lines together.
Was this page helpful? Please email me and give me feedback to make it better!
[ Back to Top ]